
Control a Neato using a Gumstix COM and a Tobi Expansion Board
This article demonstrates controlling a Neato XV Signature robot vacuum with a Gumstix Overo COM on a Tobi expansion board in a similar way to how a Gumstix COM was used to control an iRobot Create 2. The COM runs a Yocto built image with the meta-ros layer baked in and publishes laser scan data to a laptop running Ubuntu 14.04 with ROS Indigo. The laptop takes this data and generates a map of the Neato’s surroundings in real time. The laptop also sends motor commands to the Neato.
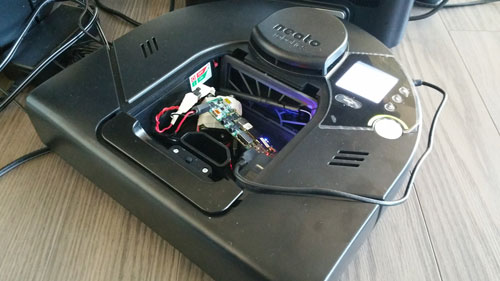
The Neato XV Signature is the successor to Neato’s popular XV-11. Both units sport a laser rangefinder and a D-shaped body for only $400. The XV-11 was (and still is) popular among hobbyists and researchers mainly due to the inclusion of a laser rangefinder at a surprisingly low price. Since the XV-11 is discontinued, we had to settle for the newer XV Signature line. I came across the programmer’s manual for the XV-11, but none for the Signature. Fortunately, the Signature appears to use the same serial interface as the XV-11. Which means we can use the neato_robot package for the XV-11 written by Michael Ferguson without much modification to his code.
The goal here is to run the Neato with a Gumstix COM, more power efficient (runs off four AA batteries) and portable compared to a laptop computer. But with a COM, we cannot run full desktop Ubuntu and ROS, thus Michael’s package cannot be used as is. Bitbake recipes must be written for the neato_robot packages and its sub-packages. I’ve forked the neato_robot package (actually a fork of jlohse’s fork which added some improvements) to include bug fixes as well as the Yocto bitbake recipes in the README.md (consult the iRobot Create 2 tutorial series for how to include bitbake recipes in your Yocto build).
GMapping and Rviz are used on the laptop to map the room. Rqt is the interface with rviz and robot steering. In the video, the robot is driven manually with the rqt interface to generate the map.
You may notice that while mapping (which starts at 1:44 in the video), I tried to display the odometry information (at 1:53 in the video), but it wasn’t accurately representing the robot’s position in reality. The other nodes from the neato_robot package are also not working currently.
Suggested areas of further exploration include: the navigation stack, autonomous simultaneous localization and mapping (SLAM), and possibly removing the Neato’s laser rangefinder to be used standalone.
Illustration: Map Generated with data from Neato Onboard Laser Rangefinder
Other Links for General Use:
- https://github.com/bmwcarit/meta-ros
 RSS
RSS