
Introduction
Welcome to Gumstix 101: Your guide to using a Gumstix computer-on-module (COM) effectively and efficiently. If you're new to using Gumstix products, just getting started with Linux, or simply need a refresher course, you've come to the right place!
After completing the tasks below, you will be ready to develop with your new Gumstix COM. For further development and more advanced product applications, a series of How Tos can be found in the Software Development section.
Get started with your Gumstix system by following these steps:
- Hardware Setup (current)
- Get an Image
- Create Bootable MicroSD Card
- Boot Your System
1. Hardware Setup
Mounting a Gumstix COM to an Expansion Board
The typical Gumstix configuration consists of a computer-on-module or COM and an expansion board.
- The expansion board can be off-the-shelf from Gumstix or custom made. Gumstix openly publishes the schematics of all off-the-shelf expansion boards to assist rapid development of custom solutions.
- For some applications, a camera board can be connected to the top of the Overo COM via a ribbon cable.
- A typical Verdex Pro assembly consists of a Verdex Pro COM sandwiched between a 60-pin expansion board and an 80-pin expansion board.
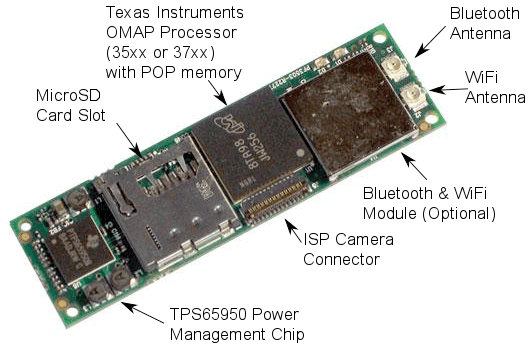
The DuoVero COM, Overo COM and Verdex Pro COMs are unique to Gumstix.
The following information addresses the most common expansion options: a DuoVero COM with Parlor expansion board, an Overo COM mounted on a Tobi expansion board, and a Verdex Pro COM mounted on a Console-VX expansion board.
Overo and Tobi
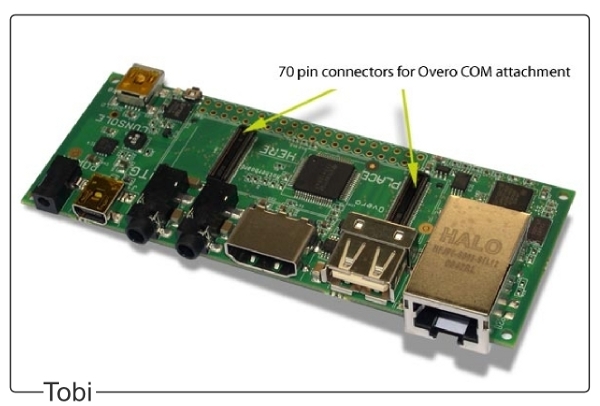
An Overo COM connects to an Overo series expansion board via the two 70-pin AVX connectors located on the bottom side of the COM. Place the Tobi board on a flat, static-safe surface, align the COM with the white outline on the board above the connectors and gently press on the COM until it clicks into place.
DuoVero & Parlor
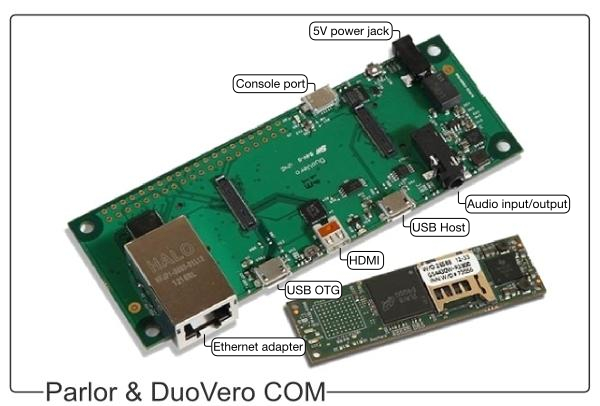
A DuoVero COM connects to a DuoVero series expansion board via the two 70-pin Hirose connectors . Place the Parlor board on a flat, static-safe surface, align the COM above the connectors and gently press on the COM until it clicks into place.
Verdex Pro & Console-VX

A Verdex Pro COM connects to an expansion board via the 80-pin connector. Place the Console-VX board on a flat, static-safe surface, position the Verdex Pro COM over the board so the white connectors are aligned and gently press down until the connectors are fully mated, i.e., completely seated.
Pepper Single Board Computer

The Pepper single-board computer requires minimal hardware setup. Connect any peripherals you would like to use, as well as the WiFi antenna and LCD cable to their respective connectors.